vvvvvvvvvvvvvvvvvvvvvvvvvvvvvvvvvvvvvvvvvvvvvvvvvvvvvvv
This page is deprecated, look at 2024 documentation instead
^^^^^^^^^^^^^^^^^^^^^^^^^^^^^^^^^^^^^^^^^^^^^^^
Drafted by Cameron and Gloria at WN’s Documentation-palooza 2k23
What is the purpose of our project?
- To collect data from basic sensors (temperature, humidity) that are placed in the beehive, and get this data to us as well as let beekeepers see live-ish measurements. This data will be stored on a device (the logging device) we can physically retrieve (or, eventually, that will stream data to us wirelessly), and also have a way to display data so beekeepers can see live temp/humidity/etc from inside their hives.
- Any data a beekeeper can get without opening the hive is useful, because opening up a hive can break propolis etc and sets back bees’ work about 3 days each time you open it
- We want to see the data ourselves because we want to do predictive analysis on the data for beekeepers, so they can know more about their hive than can learn about by inspection
- Getting data to us: We would eventually like to stream data wirelessly, but for now, we are just saving the data in a csv log file on our pico because that’s a good starting point. When we have large amounts of data, we can do analysis on it to help the beekeeper understand what is going on inside the hive, including making predictions about what is going to happen.
- Live display for beekeeper: We want beekeeper to be able to know values, but we can’t have a display always on because it would draw too much power, so we store the most recent data in non-volatile memory (EEPROM) that can be read by another device (the reading device) the beekeeper brings to our setup. This reading device will connect to the EEPROM over I2C, read its values, and display it on a little screen for the beekeeper to read.
- Solar power: Beehives are typically outside and not usually near an outlet, so we are using a solar panel and battery along with a battery manager to power the logging device.
- Our design prioritizes ease of assembly, cheap cost, and durability
What parts are involved and why, how do they fit together?
The logging device: reads from sensors, saves data locally, updates EEPROM with most current data
- RPi zero or pico
- Stores data, reads with sensors over i2c
- Chosen because of lower power consumption (~15mA in standard sleep), low cost, and ease of programming with MicroPython. Way easier to setup than all the mess of a pi zero
- See the guide
- Temperature+humidity sensor
- Measures values and is read by the Pico over i2c
- Put a little 3d-printed mesh over this so bees don’t cover it all up with gunk, designed by Matt + Vincent
- Light sensor
- Measures values and is read by pi/pico over i2c
- RTC module
- If the battery runs out of power (which can happen if there are too many cloudy days), the pico will shut down and its internal clock will reset upon restart. So we needed a module that will provide an accurate timestamp regardless of power loss
- Solar panel, battery, charging board
- Need to find part # or something identification for the solar panel and battery
- The charging board is really easy to use: just connect panel + battery and plug something into the USB to receive power
- EEPROM chip
- We chose the 24LC256 because it can be read/written over i2c, which we are already using. It has more than enough space to store the most recent data.
- Starting at page 10 in the datasheet, there is info about commands to read/write to it. Important to note that you can only write up to 64 bytes with one command due to maximum “page” size.
- Brick and screws
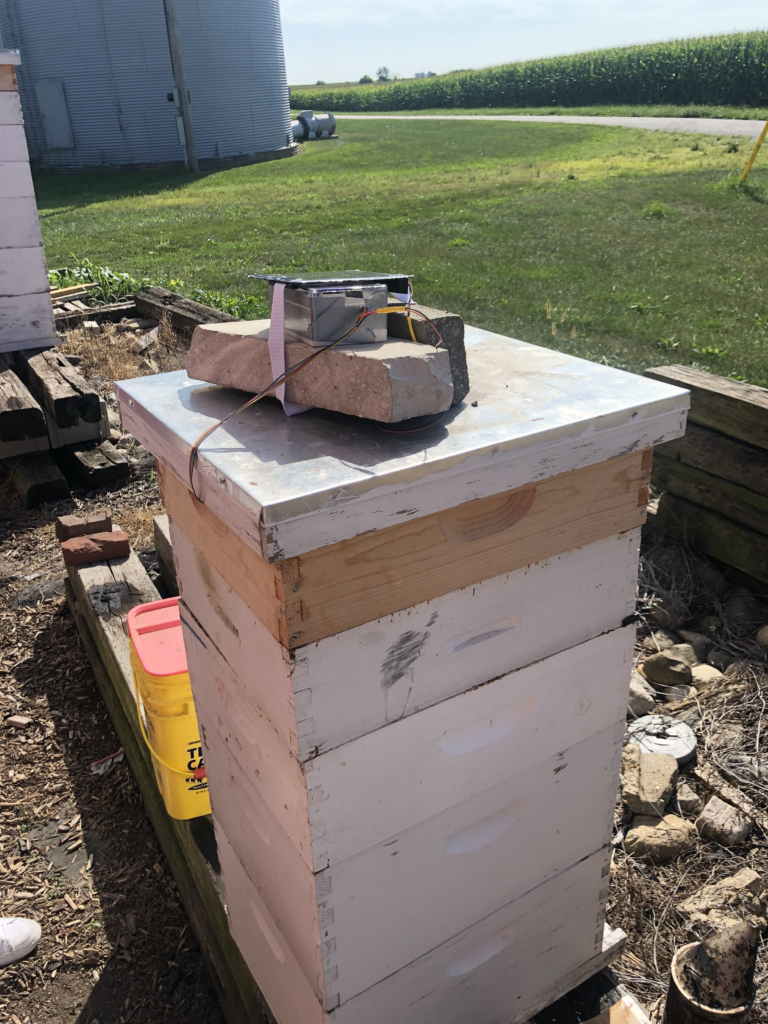
- To attach the device to a hive, we need something that will shed water (see notes about this below) and won’t get blown off by the wind. This led to the setup in Figure 2.
- Pico logging script
- New versions will be in #data-collection-project channel
- Need to elaborate on this later. But it has decent comments already
- As of now, we are saving all the text we want displayed into the EEPROM so it’s as simple as possible to read it on the reading device and display it.
- The display text is variable length, so each time we write to the EEPROM we need to:
- Clear its memory (or at least the first page or two)
- Write in our new data
- Terminate our data with a stop character so the reading device will know where data ends and unwritten bytes begin
The reading device
- Adafruit feather RP2040 and battery
- Chose to start with Adafruit feathers because they are basically prebuilt modules that can be connected and interfaced very easily. Our requirements for the reading device were that it could communicate with i2c, had a display, and was battery powered and rechargeable.
- Display (feather)
- Feather reading script
- Reads from the EEPROM and displays on the display. See above notes for pico logging script.
Who knows the most about each part?
- Cameron: everything (coding, arrangement of components, EEPROM)
- Gloria: coding (coding for EEPROM) , real time clock
- Nobert: Soldering, arrangement of components, digital screen
Where are parts stored?
- Codes are saved on discord, most recent ones probably pinned
- Components are saved in data collection box
What is something we tried or considered doing but that didn’t work out?
- Waterproofing our setup: in Aug ‘22 we put a device on Prof Schmitz hive and put the pi zero (before we migrated to a pico) inside a weatherproof enclosure (Figure 1). When water got in, it couldn’t get out. For our next field tests in March ‘23, we followed Prof Schmitz’ suggestion to make something that just sheds water, which led to the upside down box design (Figure 2).
- Picosleep: we tried using someone’s library to put the pico into a deep sleep (~1mA current draw), but it wouldn’t wake up reliably… a worthwhile future endeavor would be to get this working so we can save a ton of power.
- See bottom of this page for precompiled uf2 and basic example
- Sharing data to the display screen (still working on it)
- Using a pi zero – it draws too much current (~100mA) and drains the battery faster than it can be recharged by the solar panel
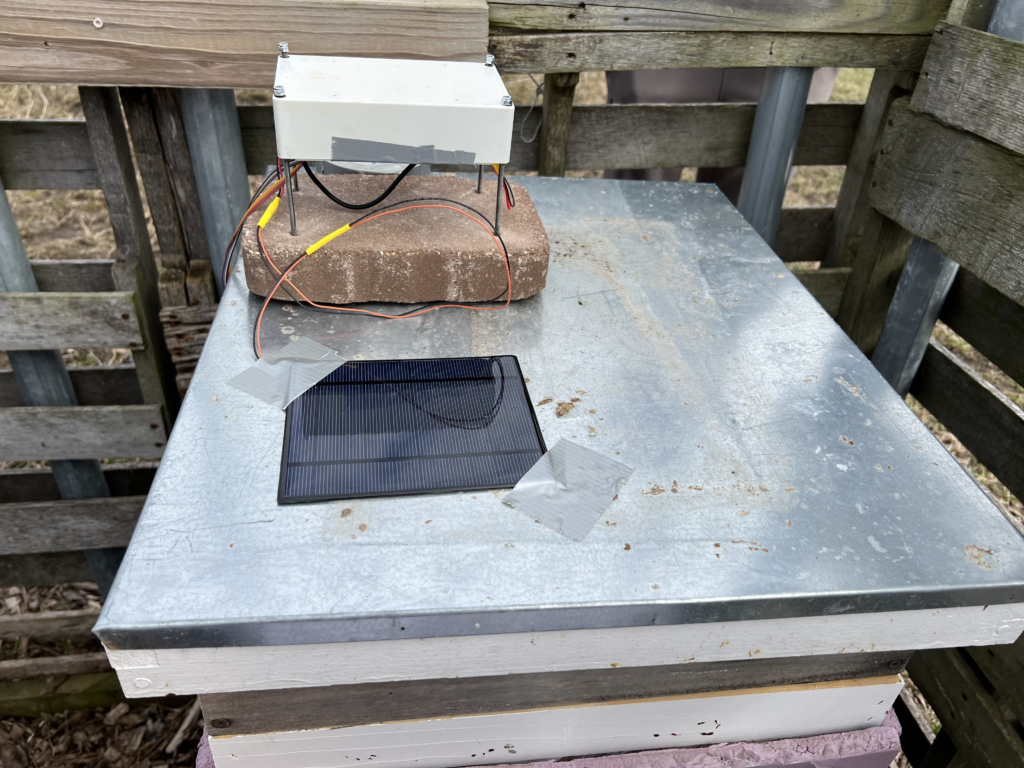
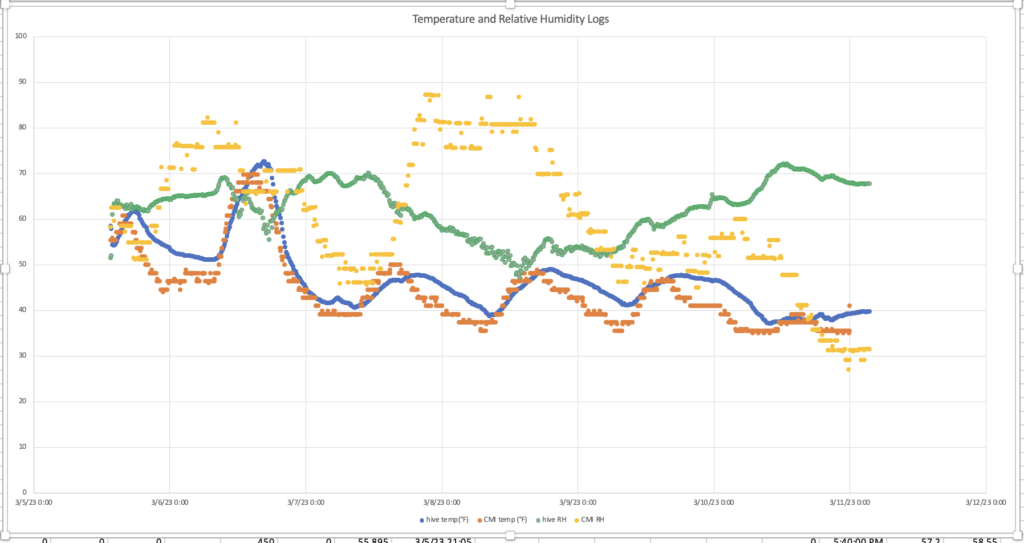
- March ’23 Beekeeping Club field test: We put a device on a hive for ~3 weeks. It logged data for ~5 days then died and didn’t revive. See Figures 2 and 3 for photos and the data graph. We consider this a success because we had longer data logging than last time, and the device didn’t fall apart / explode.
Currently still working on:
- Making sure solar panel can recharge battery reliably
- Lowering power consumption
- Multiple solar panels?
- EEPROM reading/writing
- Display output
- Integrating RTC module
What skills would a noob need to contribute?
- Microcontroller programming – arduino, python
- I2C fundamentals
- 3D printing
- Soldering
Figures